Shop Now

Showing posts with label Fantabulous Cricut Challenge Blog. Show all posts

Monday, October 6, 2014

FCCB Challenge # 231

Hi! Everyone

It's another Cricut challenge at FCCB.  This week the challenge is to make a Birthday card.  Who can't use a stash of already made Birthday cards.  I had someone in mind when I made this card.


I cut the shoes from Cricut Alphabet that came loaded on my Expression 2.  I added some Cotton Candy and Black Diamond Stickles on them to glam them up.  I also used some pink bling.  This is not the type of card I usually make but I know the recipient will appreciate it.

I had a roll of Zebra striped Washi tape and never could find a reason to use it until now.  The sentiments are from a stamp set by Fiskars and TPC Studio.  The pink and white chervon is punched using a 2.5" Fiskars punch out of a scrap of paper, YAY!.

Hope you like my glam card.  Create your Birthday card and link it to our Monday challenge.

Bye, Bye for Now,
Kim

OH! by the way I have another Halloween project to share. Click HERE to view my Witch's Hat.
And check back next week I will posting more Halloween projects.

Monday, January 27, 2014

MIX AND MATCH CHALLENGE # 195 AT FCCB

It's time for another challenge at FCCB.  This week our projects are to contain 3 different patterns of paper. I have been working on a banner for a baby shower. I used alot of different patterns on each of the flags all from the same paper stack "Little Miss" from DCWV.

 I used Elegant Edges and Storybook for this banner. I cut the letters to spell the baby's name, Autumn. I cut a different shape using different patterns of paper from Elegant Edges.  


I purchased the chipboard banner from Hobby Lobby. I painted the back with pink paint then adhered the paper to the front. The layers consist of patterned paper, a white paper doilie, the cut shapes of paper and then the letters.  It's hard to tell in my picture but there is a sublte pattern on the paper I used for the letters.


I used prima flowers and little flat back pearls for the centers.  The two butterflies are cut from the paper. I used baby blue stickles for some sparkle and another flat back pearl on the butterflies. I will be stringing it together with pink and green ribbon from my stash.

After the baby shower the banner will be used as a nursery wall decoration. Great idea for a gift don't you think?  I hope the mom-to-be loves it. I like the way it turned out. 

Our sponsor for this week is Jaded Blossom.

Show us your Mix and Match projects for a chance to win a set of stamps or be picked as a Design Team Top 5.  Have fun and link up.

Bye, Bye for Now
KIM


Thursday, January 2, 2014

HOLIDAY PROJECTS AT FCCB


HAPPY HOLIDAYS
CRAFTY BLOGGERS

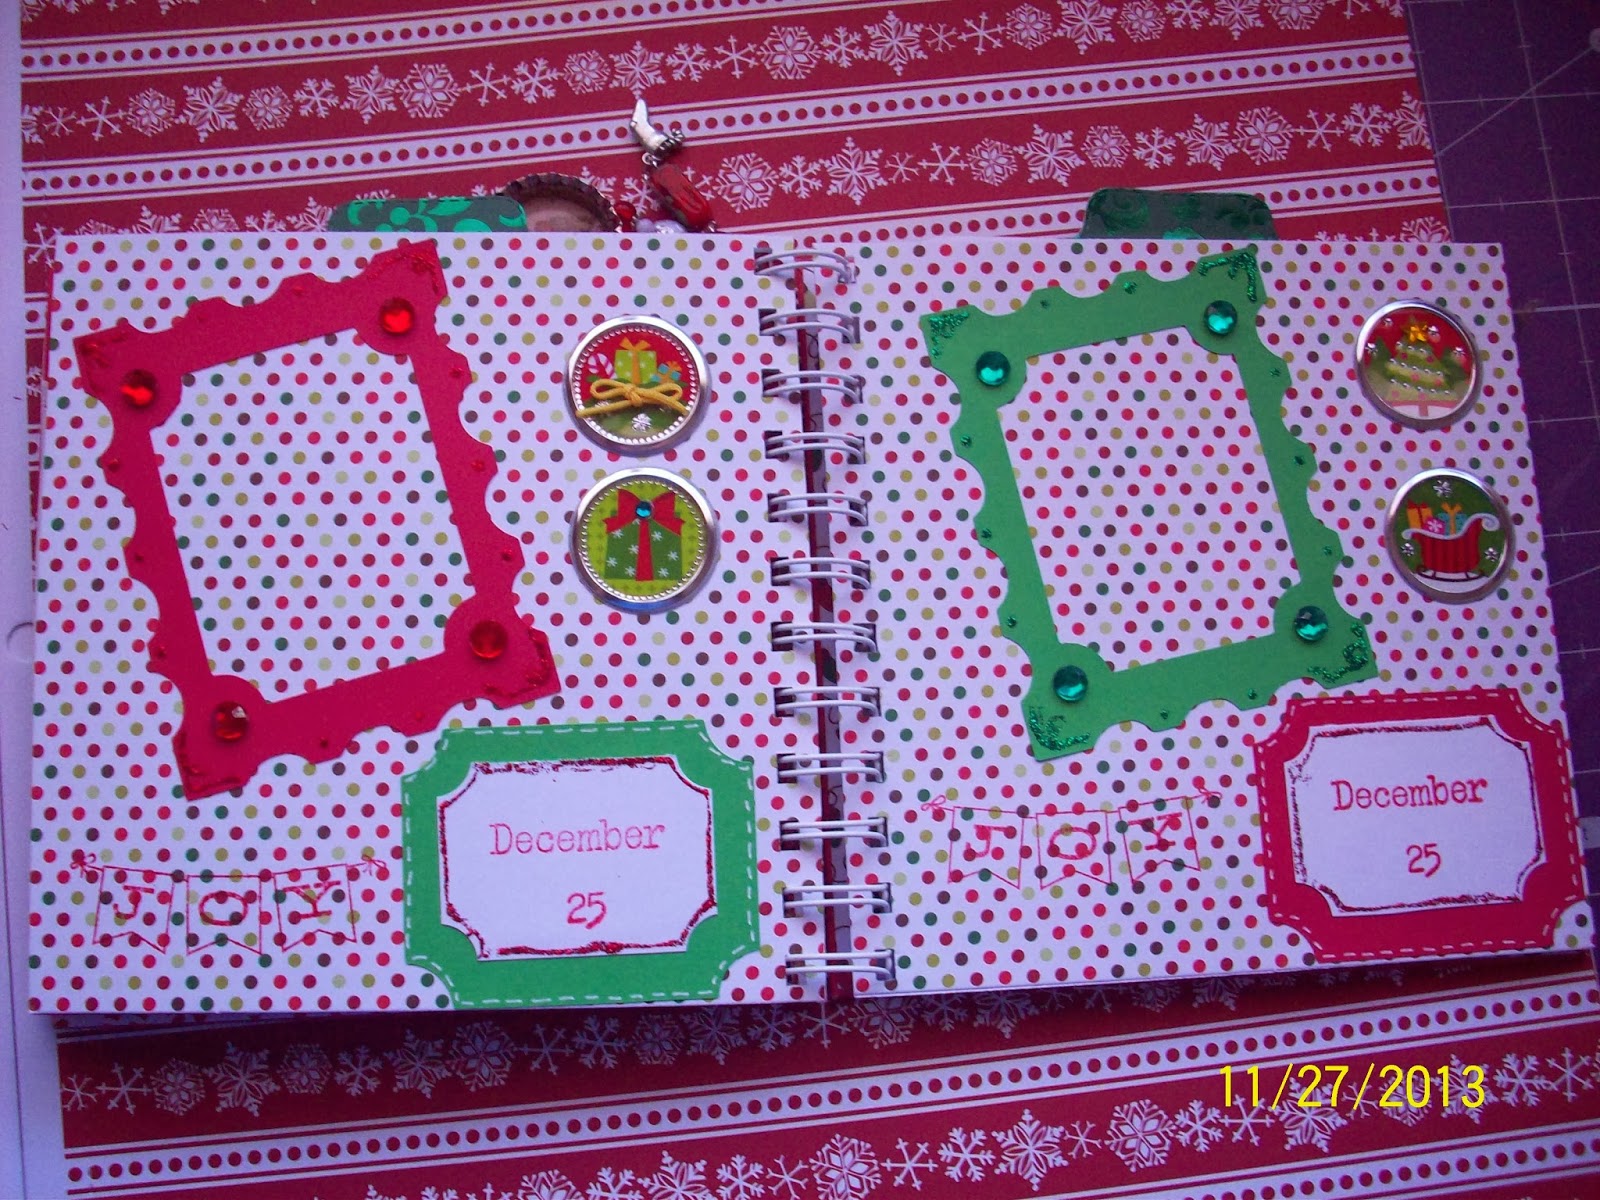
Since we are taking a few weeks off as a Design Team at FCCB each day one Design Team member is sharing a project with everyone. For my project I wanted to share a Christmas mini album I made using my Cricut and the Elegant Edges cartridge. The paper I used was DCWV Evergreen stack and embellishments from several companies. The main set is from a sticker set I bought at Tuesday Morning for .99 cents.

This post will have alot of pictures so enjoy all the details of each page. 
The cover and charms that I made. I used my bind-it-all to put it together.

Inside cover and first page. My idea for this album was to put pictures of a child's Christmas. These pages are for pictures with Santa. I cut the tags with my George and Basic Shapes.


These pages are for recording a wish list.

Next, letter to Santa.

Of course I had to include a page for pictures of cookies for Santa. My boys always liked to make cookies and put out a glass of milk on Christmas eve.

The reminder of the pages are made for pictures taken Christmas morning opening presents.

The tab peeking out on the right side is another double-sided photo mat for more pictures.

I love the way it turned out. Hope your like it too. I haven't posted a mini album in awhile so I wanted to share this one.

Make sure you check Fantabulous Cricut  Challenge Blog all through the Holidays to see what the Design Team members have to share.  Be sure to check in after the New Year to met all the new Design Team members. We will be having a Cricut Crawl and a new challenge.

Happy Holidays and
Bye, Bye for Now
 Kim


Monday, December 2, 2013

FCCB Challenge # 189: Beyond Red and Green

Well Christmas will be here before you know it so I hope you are already working on your Christmas card stash.  I have to say I am a traditional red and green color scheme for my Christmas cards and decorations, but this week we are being challenged to make a holiday project without using red and green.
Here is what I came up with and I have to say I liked thinking out of my comfort zone.


I cut my little bird from Create a Critter at 3.00".  The scalloped circle was cut from Storybook at 3.50".The paper I used is from last year DCWV "Artic Wishes". For bling I used a snowflake from Recollections and added a gemstone. I also used a gemstone for his eye. The blue snowflake ribbon was perfect for this card. I cut the banner from a Spellbinder die and stamped Merry Christmas.  The silver bells are tied onto it using blue hemp. For dimension I popped the banner up on pop dots.

Turned out pretty cute don't you think?  What colors do you like for Christmas? Would you like some blog candy in your favorate colors? Be a follower and leave me a comment. I will draw a winner on Sunday 12/08/2013.
Thanks for stopping by. 

 Bye, Bye for Now, KIM


Monday, November 18, 2013

FCCB Challenge # 187 Use an Animal

Another challenge at FCCB. For our challenge this week create a project with an animal on it.  I immediately thought of the panda on the Create a Critter cartridge. I have always wanted to cut him out because I think he is soooo CUTE.


I used DCWV Far East paper. The panda is big at 4.25".  Of course he is cut from black and white card stock. His hat is from the same paper and I inked the bottom layer. A piece of twine tied in a bow and some stickers for my sentiment and his red heart.  These stickers where starkly white and glittery so I toned them down with Vintage Photo ink. I used gloosy accents in black and white for his nose and eyes.

Simple but fun card to make. Join us this week and link up your project using an animal.

Bye, Bye for Now 
KIM


Monday, October 14, 2013

Challenge #182 Black and Purple

Ready for Halloween?  I love creating projects for Halloween. My favorite Cricut cartridge is Happy Haunting.  I have made these coffin treat boxes for the last two Halloween's.  They are always a hit.  I made this one out of black and purple cardstock.


Before gluing the lid of the box together I embossed it with my Cuttlebug folder Skulls and Scrolls. For the sentiment I used a stamp from MCT Treats for my Sweet. This is a stamp set from last year and it has a lot of great Halloween sentiments and images. The ribbon is black sheer from Offray and the button is from Liz's Paper Loft. Love how it sparkles. The flower is from my stash.  I tied the little bow and tag with black hemp.
It was very simple to construct.  After cutting the base and the lid @ 8" I used my bone folder to score on the lines. I used Score tape to put it all together. The glue I have did not dry fast enough and the box kept coming apart. The Score tape seemed to work best.

Hope you will join us this week at FCCB. Show us your black and purple creations. 

Bye, Bye, for Now
KIM


Monday, September 30, 2013

Challenge #180 Fall is in the Air

HI! Hope everyone had a good weekend. Still hot here, can't wait for fall weather to arrive.  I love the fall, cooler temperatures, football, changing leaves, and my three favorite Holidays.  You guessed it Halloween, Thanksgiving and Christmas.  All are great for scrapbooking,  as well as home decor, decorations and cards.  But most of all family photo ops.

Speaking of fallin' leaves. It will soon be time to be raking them into big piles. Here is my CAS card of changing leaves.


I used Create-A-Critter to cut the leaves and the wagon.  The wagon is cut at 1.00 and the leaves at varoius sizes from 1.00 to 1.50.  The twine is Cappicino from the Twinery and the button and flower are from my stash.  I inked all the edges with vintage photo (Tim Holtz) and used my bone folder to score the veins in the leaves.  Some of the leaves are glued directly to the base and some are on pop dots. I rolled up some the edges of the leaves for more dimension.  For the sentiment I free hand wrote it with an orange Sharpie.
I used kraft for my A2 size card.

Hope you join us this week for our "Fall is in the Air" challenge at FCCB.  Use fall colors browns, reds, oranges and yellows.  

Bye, Bye for Now
KIM

Monday, September 23, 2013

GOING PLACES CHALLENGE #179 AT FCCB

Hope everyone is having fun crafting. The challenge this week is to feature a cut using something that gets you from one place to another.  I chose a sailing ship. Of course they don't look like this one anymore, but it was kinda historic or nostalgic. I liked the thought of just sailing away across the ocean to forgein lands.  Any way here is my card.

I cut my ship from Paper Dolls Dress Up Cricut cartridge using the pirate page accessories.  I cut it at 3" in yellow, white and the base color brown. The sails are paper pieced as well as the yellow portholes. I then used my gel pens for accent strips and the flags. I used scrap pieces of paper for this. After organizing them I found it easier to find the colors I needed and didn't have to start my project with a new sheet of cardstock.  I discovered I had alot of scrap pieces that where big enough to cut small pieces.

I used kraft for the card and embossed the backgroung with a Darice folder I bought at Hobby Lobby using my 40% off coupon.  The sentiment is stamped in Vintage Photo from TCP studio stamp set, you guessed it, a bargin at $1.99 from Tuesday Morning. I think I need to call this card a bargin since I used so many inexpensive items to create it. I also made my own crinkle ribbon. Maybe I should change my blog to the "Frugal Scrapper".  How do you scrap on a bugdet these days with the economy like it is. Send me some tips if you have any.

Hope you join the challenge this week at FCCB. Link your going places project and show us how you get from place to place.

BYE, BYE, for Now
KIM

Monday, September 16, 2013

ABC, 123 CHALLENGE # 178 AT FCCB

Hope everyone had fun with the vinyl challenge last week.  This weeks challenge is to use a Cricut cut letter or number on your project. I decided to use my Crikit Gel Pens to make a set of monogrammed note cards.  I also made a cute gift bag to give them in.


I used Storybook cartridge for the "H" and the frame. The bag was cut from Baby Steps  fit to page. I lucked up on this cut while searching  the booklet for another project.  I kept it in the back of mind for furture projects and when I started planning this challenge it just popped into my head. It made a gift bag just the right size for A2 size cards.  I made four monogrammed cards using a packaged set of eight cards and envelopes. The paper I used was DCWV Magnolia Way.  Lovely papers, I hated to cut it up (a.k.a. paper hoarder) but I love the results. For the punched borders I used a Martha Stewart edge punch. I made three sets, one for my mother and one for each of my two sisters-in-law.

Here is another picture showing a detail of the monogram and the cut out in the bag. If you have a Gypsy and don't want the opening you can remove it and make a solid front. I like the way the monogram peeks through the opening.


Hope this project inspires you to join our challenge this week at FCCB. Looking forward to seeing what you come up with. Most of all have fun.

BYE, BYE, for Now


P. S. Bet you thought I forgot to let you know who won my Blog Candy. NOT, just keeping you all in suspense.  The winner chosen by random is
 DRUM ROLL PLEASE!!!

MAYRA DURAN-HERNANDEZ

Congratulations, please e-mail me (ogdendoll@gmail.com)  your mailing info and I will get your Blog Candy out to you ASAP.
Thanks for all the lovely comments and following my Blog.
KIM

Monday, September 9, 2013

Challenge #177 Vinyl EDU Cricut Crawl

Welcome to Kim's Kreations and the FCCB Vinyl EDU Cricut Crawl - Fantabulous Cricut's version of a Blog Hop!!
This week we are challenging you to create a project using vinyl you have cut using your Cricut. We have a fabulous sponsor, Cricket Vinyl Supplies. If we get 100 participants in this challenge, Cricket Vinyl Supplies will give away a Cricut Expression package that includes a Cricut Expression machine, deep cut blade, Jasmine Cricut cartridge, ten 12” x 12” assorted sheets of matte vinyl and one 12” x 12” gridded transfer tape. How exciting is that??
If you've come from Catarina's at , http://blog.docerelashop.com/ you're in the right place!  If you've just happened across my blog and would like to see all the fabulous Design Team creations head on over to Fantabulous Cricut HERE  to start at the beginning.
Make sure to check out each DT member's blog!  There will be Blog Candy along the way at ALL our DT members' blogs, and there will be a Grand Prize up for grabs at FCCB for one participant who submits a project using vinyl at FCCB!
For my project I made a home decor project. I used a picture frame that holds 9 photos.  My theme is Halloween, one of my favorite crafting holidays. Here is the entire project

I placed patterned paper inside each frame and then cut related vinyl to go on the outside glass.  This gave a lot of dimension. I will add a detailed photo of each frame below.  As you will see some of the cuts were very detailed but thye cut cleanly.  One important hint make sure you use the transfer sheet, it makes the layering and positioning a lot easier. I have to admit I tried skipping this step and it didn't work as well.
Here are the other frames.
I used Happy Hauntings cartridge as well as Halloween stacks from DCVW.


I really like the way this turned out. The vinyl made it unique and I like the shiny quality against the matte of the papers.  

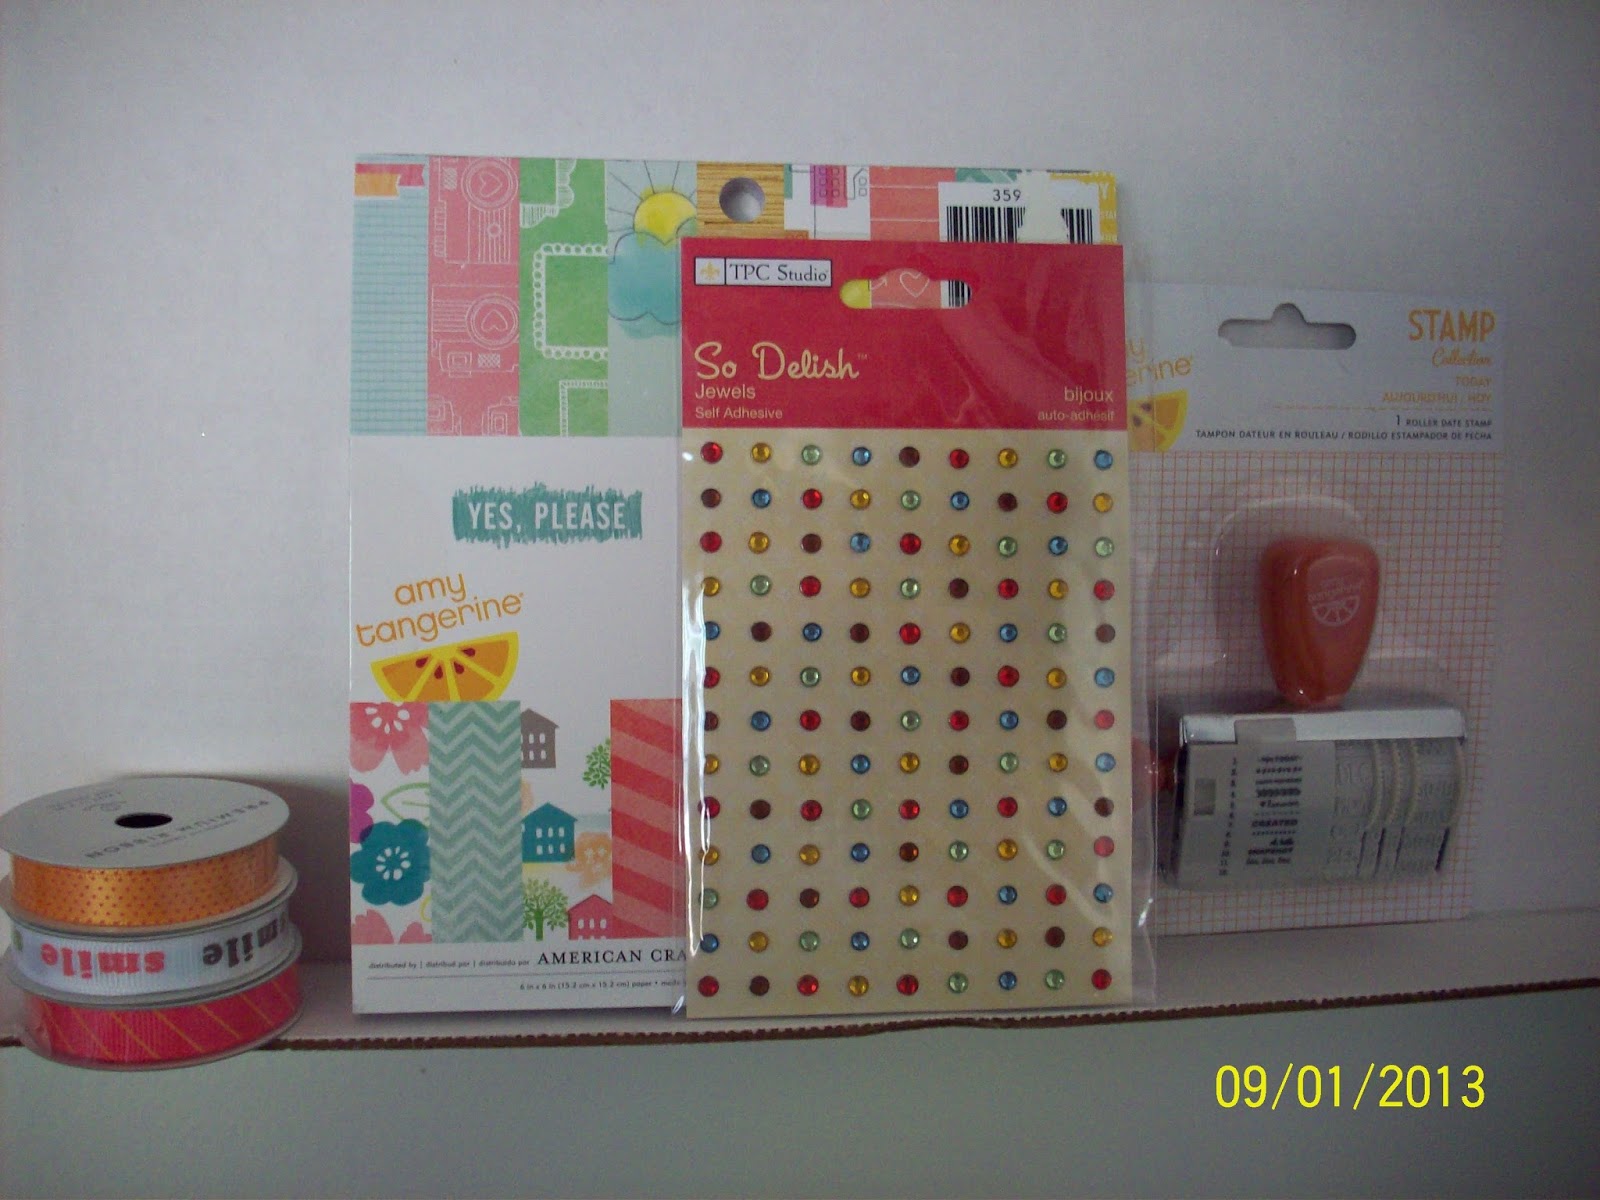
Now onto BLOG CANDY.  I am giving away the following items.

Included is 6x6 paper pad by Amy Tangerine "Yes, Please". A date stamp by Amy Tangerine that also has sayings that coordiante with the paper. I threw in a package of bling and 3 spools of ribbon by American Crafts. I bet your wondering what you need to do to win this Blog candy. It's quite simple
1) Leave a comment on my blog
2) Become a follower
The winner will be chosen by random from the comments list.  The contest ends when the collection closes on Sunday 9/15/2013 and the winner will be announced on Monday 9/16/2013.

Good Luck and don't forget to link up your vinyl project at FCCB.  Looking forward to seeing all the great projects. 
Your next stop is EMILY at molliemugsblog.blogspot.com.  Make sure to visit all the stops along the way and when you get done, make sure you link up your project to FCCB's Fantabulous Cricut Crawl post!!
Happy Crawling!! Kim
Here is the line up in case you get lost :
Kim ogdendoll.blogspot.com (You are here)
Emily molliemugsblog.blogspot.com (Next stop)

Monday, July 22, 2013

Challenge #170 Fruit Salad at FCCB

Hi! Everyone.  Are you ready for another challenge at FCCB?  Our challenge this week is to make a project with any type of fruit.  Here is my card

The card base is A2 size from "Birthday Wishes" stack from DCWV. I really like this glossy paper and chevrons are in right now.  I cut the pear from Home Accents Cricut cartridge at 3.50". I used the shadow and layer cuts.  I had to piece the layers together after I cut the shapes in four different colors of paper. Brown for the seeds, cream for the fleshy part of the pear and two shades of green for the peel.  I used Euclyptus stickles for the glitter.  The twine is from the Twinery in Honeydew.  The flower and button are from my stash.  To make the sentiment I punched it using a EK success punch and gilded the edges with a gold paint pen.  The sentiment is a stamp from My Pink Stamper and I heat embossed it using Fantage gold from Stampendous.  I love the way it melted.

That's it for my project, now it's your turn.  Make something with a fruit Cricut cut and join the challenge.

Bye, Bye for Now
KIM

Thursday, June 27, 2013

Happy Birthday Card

Hi everyone.  I have been working on a Birthday card to participate in the following challenges.
My Creative Time Designer Challenge- bling it up 
 Die Cuttin Diva's -Birthday card using 3 embellishments
Simon Says Stamp - Anything Goes

Here is my card
I used Elegant Edges Cricut cartridge to cut the frame at 3".  I then embossed Happy Birthday in the center on the striped blue paper. The paper I used is the Luxury stack from DCWV.  The edge scalloped punch I used is Martha Stewart.  The flower and bling are from Prima. I love the little pink resin flowers and pearls.  Around the frame I used liquid pearls in cream.  Some ribbon and lace finished it off.  
Well  I think I meet the above challenge requierments.

By the way be sure and join us on Monday July 1st for the Fantabulous Cricut Crawl.  The theme will be red white and blue.  The Design team, returning members and new member's will have plenty of inspiration for you so make a project and play along.

Bye, bye for Now
KIM

Monday, June 17, 2013

WEDDING DAYS Challenge # 165

This weeks challenge at FCCB is to make a wedding project or gift. I have used the Celebrate with a Flourish cartridge to make a card with a wedding cake.


I cut the white card stock base at A2 size and rounded the corners. The patterned paper is from DCWV Luxury Stack  8x8 pad.  I cut the cake at 4" and cut off the candles.  I then ran it through the Cuttle bug using Swiss Dot folder.  Instead of using the raised dots I turned it over and used the indentions.  I filled them with Crystal Stickles.  I had some trim leftover from a project and it was enough to drape onto the cake like icing.   I used a white Prima flower and a green gemstone for the top. For dimension I placed the shadow down and then popped the cake up off the shadow.

The stamp is one from the bargin bin stamped in Staz On Jet Black.  The paper was shiny and I wanted to make sure the sentiment stayed on the paper.  The sheer green ribbon is another leftover piece.

Hope you join us this week for our wedding challenge.

Bye, Bye for Now, 
KIM


Monday, May 6, 2013

CHALLENGE # 159 MOTHER'S DAY

Hi! Everyone.  Are you having winter again like we are here?  The lows for last night and tonight are in the 30's. Really!  I will be glad when it gets warm and stays warm. Anyway I hope it's warm next weekend my brothers and our families are getting together for a cookout for Mother's Day. I am all ready with my card.


I used Counry Life for my banner cut at 2".  Each of the flags are popped up and strung with Blossom twine from the Twinery. The papers I used are Coredinations Lap of Luxury for the base and the patterned paper is DCWV Luxury stack. The colors really went together well.  I punched the border using a Martha Stewart punch.  The sentiment is a stamp I've had for awhile and don't remember the name.  I my have gotten it in a bargin bin somewhere.  The two white roses, my Mom's favorite flowers, are from the $1.50 bin at Michael's. I think she will like it.  She thinks I'am so creative because I make all her cards. 

Hope your able to have a wonderful day with your Mom. If your a Mom then Happy Mother's Day to you. Join us at FCCB and share your Mother's Day card creations with us.

Bye, Bye, for Now
KIM  

Monday, April 15, 2013

Challenge #156 at FCCB, April Showers

This week the challenge at FCCB is to use an umbrella on your project.  I have decided to submit a layout page from a scrapbook I have been working on for my niece.  I am sooo! behind. Her baby is a year old and I am just getting around to making this scrapbook from February last year. This challenge motivated me to get started and I am almost done. Yeah!


I used two Cricut cartridges for this layout, Celebrate with a Flourish for the umbrella and Country Life  for the banner. The umbrella was cut at 4" in three different colors and paper pieced.  I accented it with Stickle's in baby blue and turquoise.  The banner is cut in two sizes to layer and strung together with Martha Stewart twine in blue and white. I also used felt blue letters by Martha Stewart.  I got these for only a $1.00 at TJMaxx.  Needless to say I bought all three sets they had which was good since I needed that many to complete the scrapbook.  The invitation is from the baby shower.  Throughout the scrapbook I incorporated little memento's from the baby shower.

Here's the tip for this project.  I ran out of O's so I took the Q's and removed the tails to make O's.  When do you use Q's anyway? Not very often.

Join us this week with your umbrella project and as always have fun.
Bye, Bye for Now, 
KIM

Sunday, March 24, 2013

Challenge #154 Easter at FCCB

This weeks challenge  at FCCB is to create an Easter project.  I have been making Easter cards and saved my favorite for this challenge.  My Mom loves roses and this card was made for her.  I think it's beautiful.  I used my Wild Card cartridge to cut the frame with my Cricut.


For the card base and frame I painted it with Martha Stewarts Pearlized Antique Silk paint. I then used a paper from DCWV "Butterfly Garden" stack and punched the edge with my Martha Stewart scalloped edge punch. The ribbon is dyed seam binding using Rit green and Key Lime Glimmer Mist. The pearl spray I found at a flea market for 50 cents. The pink pearls at each corner of the frame are from Recollections.  This image is another one from Gecko Galz, "Hops and Peeps".

I hope my Kreation has inspired you to join us for this weeks Easter challenge.
Bye, Bye, for Now
KIM

Monday, March 18, 2013

FCCB Challenge # 153 Spring is in the Air

This weeks challenge at FCCB is to include a kite or balloon on your project. I have used  three Cricut cartridges, George and Basic Shapes, Doodlecharms and Paper Doll Dress Up.  Here is my card.


The papers I used are My Mines Eye 6 x 6 Away We Go stack. I cut the basket @ 2 1/2' from Doodlecharms.  The balloon is also 2 1/2 " from George and Basic Shapes.  The boy is cut @ 2" from Paper Doll Dress up.  I used Peachy Keen Everyday Faces stamp and colored his face with my Jelly Roll pens. The sentiment is from a stamp set I bought at Tuesday Morning by TCP Studios.  For the ropes I used Cappucino twine from the Twinery.  To add dimension I used pop dots on the balloon and basket.  I think it looks like the balloon is high in the sky. I love the expression on the boys face.

Hope this card will inspire everyone to join the challenge this week.  Good Luck and have fun.

Bye Bye for Now,
KIM


Sunday, July 29, 2012

WEDDING BLISS FCCB #121


My wedding card was made using "Paper Doll Dress Up".  I used the bride and groom cuts on page 30 and 31.  I only cut out the clothes, top hat and veil.  I wanted a more grown up look.  Cutting out the paper dolls looked too childish to me. My cut was 2 1/2".   

I used my white gel pen and Black Diamond stickles on the tux and Crystal stickles on the gown.
The stamp I used for the sentiment was something I had but I don't know who it's by. I think it was a generic stamp.

The ribbon is from Walmart. It was left over from when I made the wedding favors.  You may remember them from an earlier post. I made the bow tie and sash from a small piece.
I think it turned out cute.  Wish me luck in the challenge over at Fantabulous Cricut Challenge Blog.

Bye Bye for now
Kim

Sunday, February 19, 2012

Fantabulous Cricut Challenge Blog

Thanks everyone for leaving me comments and becoming followers. I have had so many helpful hints. I have also discovered numerous new blogs with lots of creative designs and ideas.
I will try to post a card I made for the FCCB challenge to use a pun.  I'm  trying post this from my phone.
Another thing I need some help  with is grabbing badges or buttons and getting them to my blog.

Here's what I used to make my Easter card
Cricut cuts:  "Celebrate with a Flourish" cartridge, I cut the bunny and all the layers @ 3 1/2".
Papers used:  White cardstock  cut A2 size and the corners rounded  with EK success punch.
DCWV purlpe polka dot and plaid from Nursery pack from  Big Lots.  Solid purple from stash.  Both greens came from Martha Stewart 8x8 stack.
Embellishments:  pink flowers and yellow buttons from stash.  Purple DMC floss #340 on buttons and on card.
Colorbox cats eye chalk used on edges' Wistera on bunny and Ice Jade on grass.
Stickles Eucalyptus to bling up the grass.
Sentiment was written few hand on purple with white gel pen and flag cut free hand.
Stitching around bunny and sentiment was done with a purple gel pen.

So there you have it.  Now I have to get busy on scrapbooking my nieces baby shower.  I made a real cute card for her. I will have to post it so everyone can see it.
Thanks for joining on my blogging adventure!