Shop Now

Monday, December 9, 2013

FCCB Challenge #190 Holiday Cards

Hope everyone is getting all their crafting done for Christmas.  Here's a little inspiration for a quick and easy card. I let the paper do most of the work for me.  This is a 6x6 Christmas pad from MME, Merry & Bright.
I added a cut from Christmas Noel cartridge and added some trim and bling.  This reindeer has three layers and is cut at 3.50".


As you can see the sentiment is already on the paper as well as some other details. I couldn't resist adding  a red rhinestone for the reindeer's nose. 

 Hope you will share your creations with us at FCCB for our Holiday card challenge. Check out our blog for more inspiration from the Design Team.

Bye, Bye for Now
Kim

Monday, December 2, 2013

FCCB Challenge # 189: Beyond Red and Green

Well Christmas will be here before you know it so I hope you are already working on your Christmas card stash.  I have to say I am a traditional red and green color scheme for my Christmas cards and decorations, but this week we are being challenged to make a holiday project without using red and green.
Here is what I came up with and I have to say I liked thinking out of my comfort zone.


I cut my little bird from Create a Critter at 3.00".  The scalloped circle was cut from Storybook at 3.50".The paper I used is from last year DCWV "Artic Wishes". For bling I used a snowflake from Recollections and added a gemstone. I also used a gemstone for his eye. The blue snowflake ribbon was perfect for this card. I cut the banner from a Spellbinder die and stamped Merry Christmas.  The silver bells are tied onto it using blue hemp. For dimension I popped the banner up on pop dots.

Turned out pretty cute don't you think?  What colors do you like for Christmas? Would you like some blog candy in your favorate colors? Be a follower and leave me a comment. I will draw a winner on Sunday 12/08/2013.
Thanks for stopping by. 

 Bye, Bye for Now, KIM


Thursday, November 28, 2013

HAPPY THANKSGIVING

Hope everyone will get to spend the day with their family and friends. I wanted to say Happy Thanksgiving to all my friends and followers in blog land, too.  I made this card for you all today.


This was quick and simple, made it while I was waiting for food to cook.
I used three layers of paper and then tied orange gingham ribbon into a bow.
The rest are Thanksgiving stickers from Wal Mart.

Have a great Holiday and see you back here. Lots of crafting time no work until Monday.

Bye, Bye for Now, 
Kim

Monday, November 25, 2013

Opps, SORRY 'BOUT FCCB POST FOR #188

I forgot to post this morning from my computer at home so I tried posting from my phone and it posted on the date I drafted the project so you can find it if you scroll down or click a HERE and it will take your straight there.
 Bye, Bye for Now
KIM

Monday, November 18, 2013

FCCB Challenge # 187 Use an Animal

Another challenge at FCCB. For our challenge this week create a project with an animal on it.  I immediately thought of the panda on the Create a Critter cartridge. I have always wanted to cut him out because I think he is soooo CUTE.


I used DCWV Far East paper. The panda is big at 4.25".  Of course he is cut from black and white card stock. His hat is from the same paper and I inked the bottom layer. A piece of twine tied in a bow and some stickers for my sentiment and his red heart.  These stickers where starkly white and glittery so I toned them down with Vintage Photo ink. I used gloosy accents in black and white for his nose and eyes.

Simple but fun card to make. Join us this week and link up your project using an animal.

Bye, Bye for Now 
KIM


Monday, November 11, 2013

Challenge # 186, Ribbons and Buttons

For our challenge this week use at least one ribbon and one button on your project and as always a Cricut cut.
Here is my card using the County Life cartridge.


I used the wheat cut @3.50". I have never used this cut and it was a little difficult to put together. It had a lot of tiny pieces even cut at this size. I'm still not sure I put all the pieces in the right place. I used brown coordinations card stock for the base and coordinations kraft for my second layer. The printed paper is left over from another project.
 For the sentiment I used MCT stamp set "Piles of Smiles". Original stamp says Hello Fall, I masked off the Fall and just used the Hello. The label is a left over cut out from my Halloween stack from MME. I liked the harlequin pattern and the colors were perfect. 
The image is from Gecko Galz collage sheet "Sunnybrook". I used my watercolor makers to add color to the image. I used some vinyl trim I got from the bargin bin at Michael's. A black button and some hand dyed seam binding and this card is ready for the FCCB challenge.

Come join us for our ribbon and button challenge this week. Can't wait to see what you create.

Bye, Bye for Now
Kim

Saturday, November 9, 2013

FCCB Sparkle and Bling Challenge # 188

Hi! Everyone this week at FCCB the challenge is to make a project with sparkle and bling. Since I am working on Christmas cards I just added some glitter and sequins to my  wreath card. I cut this wreath from the Celebrate with a Flourish cartridge at 3.00".


This card was quick and simple to make. I used red card stock for the base and rounded the bottom corners. This card opens by flipping up. Then I cut white card stock and rounded the bottom corners. I used a red glitter pen to faux stitch. The Merry Christmas is heat embossed with sticky embossing powder and Garnet  Martha Stewart glitter was sprinkled on and heated also.  The keeps the glitter from flaking off. For the bow I used red watercolor marker to define the bow and the red glitter pen for polka dots which are kinda hard to see in the picture. The cut has little red berries but instead I used red sequins for sparkle.

Here is the inside of this card. 

Sometimes I don't finish the insides so I can use them as I need them and add a message that is appropirate for the occasion, but I know Who I am sending this card to so I went ahead and finished it.

Hope you share your sparkle and bling project with us and link up to our challenge at FCCB.

Bye, Bye for Now
KIM


Fall Party at The Shabby Tea Room

Hi everyone hope your having time to craft today. I have made a challenge card for The Shabby Tea Room "Fall Party". Requirements for this challenge: banner, fall theme, yellow and orange and a cupke/cake.  I believe I met all these requirements in my Fall card.


I used a Halloween stack from My Mind's Eye for my papers. The base and second layer are kraft paper. I made the banner and strung it on some matching twine and brads. I punched a yellow circle and used brown glitter stickers for FALL.  The cupcakes were stamped using a .49 cent stamp from Tuesday Morning which I colored with Inkadinkadoo watercolor markers and a water brush. I like the cupcake toppers, an acorn and a pumpkin. The label and harlequin banners are cut outs from the paper pad.  I used Tim Holtz Vintage Photo to distress ink all the edges.

Join this fun challenge at The Shabby Tea Room.

Bye, Bye for Now
Kim


Thursday, November 7, 2013

Challenge Christmas Cards

Here today to enter a few challenges.  My first card is for Simon Says Stamps Wednesday challenge CAS (clean and simple).

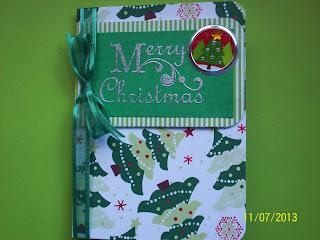
This was really simple to make. I used DCWV "Evergreen" stack for my card base. I heat embossed Merry Christmas using silver embossing powder and a $1 stamp from Tuesday Morning's on green cardstock. The little tree embelishment is from Recollections and the green striped paper is Paper Studios  "Holiday Cheer" 6x6 pad.  I used foam adhesive for dimension and found a scrap of green ribbon from my stash.

Second card is for the sketch challenge at Pink Elephant.


I used the same 6x6 paper pad "Holiday Cheer" for the green strip and patterned paper. I mounted a K&Company die cut onto red card stock which I also used for my card base. On this card I used Vintage Photo distress ink on all the edges. For dimension I popped up the die cut and the red cardstock. A red and white gingham ribbon was the finishing touch. 

Thanks for viewing my cards. On to another project.

Bye, Bye for Now
Kim

If you are looking for this weeks FCCB post click HERE


Monday, November 4, 2013

FCCB Blog Crawl Anything Goes


Welcome to a Fantabulous Cricut Blog Crawl
A blog crawl is our version of a Blog hop. We are opening up a DT call, please see the
They are giving away a bag of crafty goodness to one lucky challenge participant.
Be sure to visit each of the Design Team members' blogs to see their projects.
If you get lost along the way, you can go back  to the  
When you are done with the crawl, go back to the FCCB blog and link up your project.
 The challenge is Anything Goes! We want to see your Cricut projects. To qualify for the weekly prize for a fabulous sponsors, you need to make sure to have at least 1 Cricut cut.

For my project I made a Birthday card using the marquee cut from Storybook.

 I used patterned paper from Joann's. The embellishments are stickers from the dollar store by Miss Elizabeth and the pearl bling is Recollections from Michael's. I used Martha Stewart glittler and glossy accents for the border and for the sentiment I used sticky embossing powder to heat set the glitter. 

Blog Crawl List:

Cindy -
Kim -

Emily -

Lynn -
- Quick Chick Designs
Nikki -
Michelle-

Joneita-

Amy T -


Have fun along the way.
Bye, Bye for Now
Kim

Monday, October 28, 2013

CHALLENGE #184 AT FCCB

The challenge this week is Signs Of Fall at FCCB. Fall is finally here in the south. It's time to visit the pumpkin patch.  Here is my pumpkin card, a sure sign of Fall.


I used kraft card stock for my base.  The pretty fall paper is from DCWV, All Seasons.  I used a stamp and die set from MCT time for my sentiment.  I placed some burlap behind the sentiment for texture and added an  orange sheer ribbon from Offray.  
The pumpkin was cut at 2.00" from Happy Hauntings.  Instead of cutting the pumpkin from patterened paper I cut it out of white card stock.  Remember our summer challenge were we used digital images from The Paper Nest?  Well I have been practicing coloring and I think I did a much better job coloring this pumpkin. I used watercolor makers from Inkadinkadoo in terra cotta and olive green.  It really helps if you have a water brush to do the blending. I found one at my local Joann's. I used a 50% off coupon so it wasn't too expense. 
Hope my fall card inspires you to join our challenge this week. Link up at FCCB and have fun crafting.

Bye, Bye for Now 
KIM

Thursday, October 24, 2013

ANOTHER HALLOWEEN CARD

I would like to share another card I made for Halloween. I am entering it in the following challenges.
Simon Says Stamps - Halloween
and
Pink Elephant - Trick or Treat


I used My Minds Eye Wicked Merchant Malvado paper stack and embellishments. It was quick and easy with everything already matched in color and style. 
Thanks for looking.
Bye, Bye for Now
KIM

Monday, October 21, 2013

Challenge # 183 at FCCB

This weeks challenge is to make a home decor project. I made this Halloween banner using two Cricut cartridges, Happy Haunting and Celebrate with a Flourish. I had diffuculty photographing the entire banner into one picture so I took several pictures showing the detail of it in sections.


S
P
O
O
K
Y

I used the Vampire font from Happy Haunting for my letters to spell SPOOKY. The first flag has a witch flying across the moon from Celebrate with a Flourish. I used eyelash trim in red and black and black sheer ribbon. I cut several frames from Happy Haunting and used aged gold embossing powder to make them look like aged metal.  I used several stickers and brads from my Halloween stash and the paper line I used was from DCWV Ghosts and Goblins. 
That's it. Hope you enjoyed
and get inspired to make your own project
Link up to our challenge at FCCB

Bye, Bye for Now, 
KIM

Thursday, October 17, 2013

Welcome Fall Card

I made a card for The Shabby Tea Room Challenge this week. The challenge is to use a fall theme including leaves and pumpkins and a stamped image. Here is my card.


I used a digital image from Janet's Digital Paper. The A2 sized card is made with brown card stock.
I used some orange polka dot paper scrap added some burlap and orange gingham ribbon. The sentiment and image is a stamp and die from My Creative Time. I cut the leaves on my Cricut.

Here's a tip. 
 I knew I would be making a lot fall projects and would need leaves so when I made my fall challenge card for FCCB I cut lots of leaves in various sizes using fall colors.  I pop dotted several onto this fall card.

I distressed the edges and inked them with Vintage Photo, Tim Holtz. I rounded the corners and added some orange bling and done.

Bye, Bye, for Now 
KIM

Monday, October 14, 2013

Challenge #182 Black and Purple

Ready for Halloween?  I love creating projects for Halloween. My favorite Cricut cartridge is Happy Haunting.  I have made these coffin treat boxes for the last two Halloween's.  They are always a hit.  I made this one out of black and purple cardstock.


Before gluing the lid of the box together I embossed it with my Cuttlebug folder Skulls and Scrolls. For the sentiment I used a stamp from MCT Treats for my Sweet. This is a stamp set from last year and it has a lot of great Halloween sentiments and images. The ribbon is black sheer from Offray and the button is from Liz's Paper Loft. Love how it sparkles. The flower is from my stash.  I tied the little bow and tag with black hemp.
It was very simple to construct.  After cutting the base and the lid @ 8" I used my bone folder to score on the lines. I used Score tape to put it all together. The glue I have did not dry fast enough and the box kept coming apart. The Score tape seemed to work best.

Hope you will join us this week at FCCB. Show us your black and purple creations. 

Bye, Bye, for Now
KIM


Sunday, October 6, 2013

Halloween Card #1

It's raining here today. Remanents of Karen in the Gulf. Great time to craft for Halloween. I made this card using an image from Gecko Galz. I wanted to share it with everyone.


Here is the inside.

The paper I used is from My Mind's Eye "Haunted".  I used a Martha Stewart punch on the orange chevron paper for the drippy effect. I used orange stickles on the image to highlight her dress and the pumpkin. The ribbon is black sheer from Offray and I used a rhinestone button from Liz's papaer loft tied with black hemp. The Witche's Brew label is from the paper collection. I crumpled it up to distress it. All the edges are inked with Tim Holtz Black Soot. For accent I used black adhesive pearls in two groups of three.   

Hope you like it. I will be posting more during this week. Check back to see what I've been creating for Halloween. 

Bye, Bye for Now 
KIM


Monday, September 30, 2013

Challenge #180 Fall is in the Air

HI! Hope everyone had a good weekend. Still hot here, can't wait for fall weather to arrive.  I love the fall, cooler temperatures, football, changing leaves, and my three favorite Holidays.  You guessed it Halloween, Thanksgiving and Christmas.  All are great for scrapbooking,  as well as home decor, decorations and cards.  But most of all family photo ops.

Speaking of fallin' leaves. It will soon be time to be raking them into big piles. Here is my CAS card of changing leaves.


I used Create-A-Critter to cut the leaves and the wagon.  The wagon is cut at 1.00 and the leaves at varoius sizes from 1.00 to 1.50.  The twine is Cappicino from the Twinery and the button and flower are from my stash.  I inked all the edges with vintage photo (Tim Holtz) and used my bone folder to score the veins in the leaves.  Some of the leaves are glued directly to the base and some are on pop dots. I rolled up some the edges of the leaves for more dimension.  For the sentiment I free hand wrote it with an orange Sharpie.
I used kraft for my A2 size card.

Hope you join us this week for our "Fall is in the Air" challenge at FCCB.  Use fall colors browns, reds, oranges and yellows.  

Bye, Bye for Now
KIM

Monday, September 23, 2013

GOING PLACES CHALLENGE #179 AT FCCB

Hope everyone is having fun crafting. The challenge this week is to feature a cut using something that gets you from one place to another.  I chose a sailing ship. Of course they don't look like this one anymore, but it was kinda historic or nostalgic. I liked the thought of just sailing away across the ocean to forgein lands.  Any way here is my card.

I cut my ship from Paper Dolls Dress Up Cricut cartridge using the pirate page accessories.  I cut it at 3" in yellow, white and the base color brown. The sails are paper pieced as well as the yellow portholes. I then used my gel pens for accent strips and the flags. I used scrap pieces of paper for this. After organizing them I found it easier to find the colors I needed and didn't have to start my project with a new sheet of cardstock.  I discovered I had alot of scrap pieces that where big enough to cut small pieces.

I used kraft for the card and embossed the backgroung with a Darice folder I bought at Hobby Lobby using my 40% off coupon.  The sentiment is stamped in Vintage Photo from TCP studio stamp set, you guessed it, a bargin at $1.99 from Tuesday Morning. I think I need to call this card a bargin since I used so many inexpensive items to create it. I also made my own crinkle ribbon. Maybe I should change my blog to the "Frugal Scrapper".  How do you scrap on a bugdet these days with the economy like it is. Send me some tips if you have any.

Hope you join the challenge this week at FCCB. Link your going places project and show us how you get from place to place.

BYE, BYE, for Now
KIM

Monday, September 16, 2013

ABC, 123 CHALLENGE # 178 AT FCCB

Hope everyone had fun with the vinyl challenge last week.  This weeks challenge is to use a Cricut cut letter or number on your project. I decided to use my Crikit Gel Pens to make a set of monogrammed note cards.  I also made a cute gift bag to give them in.


I used Storybook cartridge for the "H" and the frame. The bag was cut from Baby Steps  fit to page. I lucked up on this cut while searching  the booklet for another project.  I kept it in the back of mind for furture projects and when I started planning this challenge it just popped into my head. It made a gift bag just the right size for A2 size cards.  I made four monogrammed cards using a packaged set of eight cards and envelopes. The paper I used was DCWV Magnolia Way.  Lovely papers, I hated to cut it up (a.k.a. paper hoarder) but I love the results. For the punched borders I used a Martha Stewart edge punch. I made three sets, one for my mother and one for each of my two sisters-in-law.

Here is another picture showing a detail of the monogram and the cut out in the bag. If you have a Gypsy and don't want the opening you can remove it and make a solid front. I like the way the monogram peeks through the opening.


Hope this project inspires you to join our challenge this week at FCCB. Looking forward to seeing what you come up with. Most of all have fun.

BYE, BYE, for Now


P. S. Bet you thought I forgot to let you know who won my Blog Candy. NOT, just keeping you all in suspense.  The winner chosen by random is
 DRUM ROLL PLEASE!!!

MAYRA DURAN-HERNANDEZ

Congratulations, please e-mail me (ogdendoll@gmail.com)  your mailing info and I will get your Blog Candy out to you ASAP.
Thanks for all the lovely comments and following my Blog.
KIM

Sunday, September 15, 2013

Another Challenge Simon Says Stamp

This is short post just wanted to share a Halloween card for the challenge this week at Simon Says Stamp Wednesday Challenge Blog. They want your project to have embossing dry or heat. I embossed my card using the Cuttlebug and folder Skulls and Scrolls.


I made this card clean and simple (CAS). It was quick and easy. Used black and orange card stock. Embossed and inked the orange. I used MCT "Treats for my Sweet" stamp set for my sentiment stamped in Black Soot / Tim Holtz.  Black sheer ribbon and a bling button from Liz's Paper Loft tied with orange and white twine from theTwinery. The skull is an embellishment from Jolee's Boutique.

This card would be very easy to mass produce if you have alot of card to send out. Hope you enjoyed. See you back here tomarrow.

BYE, BYE, for NOW
KIM

Friday, September 13, 2013

Shabby Tea Room Challenge #183 "Time Flies" and Photo Inspiration.


I have been crafting a lot today. Finished several projects and thought I would enter a few challenges. Here is the card I made for Shabby Tea Room.


I made this manly card using Graphic 45 Well Groomed Man papers and a watch from Jolee's Boutique.
I used Black Glossy Accents and several brads. I tried to make the chain look like a watch fob. I like the way it looks. I used pop dots and foam tape to give the layers different height. Here is the photo inspiration for the challenge.

 Come and play along. If you like shabby this is a perfect place to share your projects.

Bye, Bye for Now 
KIM


Monday, September 9, 2013

Challenge #177 Vinyl EDU Cricut Crawl

Welcome to Kim's Kreations and the FCCB Vinyl EDU Cricut Crawl - Fantabulous Cricut's version of a Blog Hop!!
This week we are challenging you to create a project using vinyl you have cut using your Cricut. We have a fabulous sponsor, Cricket Vinyl Supplies. If we get 100 participants in this challenge, Cricket Vinyl Supplies will give away a Cricut Expression package that includes a Cricut Expression machine, deep cut blade, Jasmine Cricut cartridge, ten 12” x 12” assorted sheets of matte vinyl and one 12” x 12” gridded transfer tape. How exciting is that??
If you've come from Catarina's at , http://blog.docerelashop.com/ you're in the right place!  If you've just happened across my blog and would like to see all the fabulous Design Team creations head on over to Fantabulous Cricut HERE  to start at the beginning.
Make sure to check out each DT member's blog!  There will be Blog Candy along the way at ALL our DT members' blogs, and there will be a Grand Prize up for grabs at FCCB for one participant who submits a project using vinyl at FCCB!
For my project I made a home decor project. I used a picture frame that holds 9 photos.  My theme is Halloween, one of my favorite crafting holidays. Here is the entire project

I placed patterned paper inside each frame and then cut related vinyl to go on the outside glass.  This gave a lot of dimension. I will add a detailed photo of each frame below.  As you will see some of the cuts were very detailed but thye cut cleanly.  One important hint make sure you use the transfer sheet, it makes the layering and positioning a lot easier. I have to admit I tried skipping this step and it didn't work as well.
Here are the other frames.
I used Happy Hauntings cartridge as well as Halloween stacks from DCVW.


I really like the way this turned out. The vinyl made it unique and I like the shiny quality against the matte of the papers.  

Now onto BLOG CANDY.  I am giving away the following items.

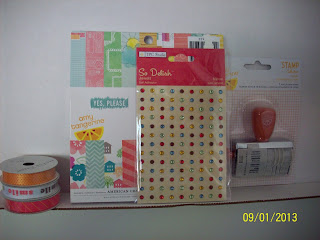
Included is 6x6 paper pad by Amy Tangerine "Yes, Please". A date stamp by Amy Tangerine that also has sayings that coordiante with the paper. I threw in a package of bling and 3 spools of ribbon by American Crafts. I bet your wondering what you need to do to win this Blog candy. It's quite simple
1) Leave a comment on my blog
2) Become a follower
The winner will be chosen by random from the comments list.  The contest ends when the collection closes on Sunday 9/15/2013 and the winner will be announced on Monday 9/16/2013.

Good Luck and don't forget to link up your vinyl project at FCCB.  Looking forward to seeing all the great projects. 
Your next stop is EMILY at molliemugsblog.blogspot.com.  Make sure to visit all the stops along the way and when you get done, make sure you link up your project to FCCB's Fantabulous Cricut Crawl post!!
Happy Crawling!! Kim
Here is the line up in case you get lost :
Kim ogdendoll.blogspot.com (You are here)
Emily molliemugsblog.blogspot.com (Next stop)

Monday, September 2, 2013

FCCB CHALLENGE #176 NAME THAT TUNE

Hi! everyone, missed the challenge last week because of a family emergency. Everything is OK now and I am back to my routine.  Sometimes life throws you a curve ball, but you can make it through it.  Now for my card this week.


I know Christmas right? It will be here before you know it and it never hurts to get a head start.  I used Christmas Noel Cricut cartridge for the ribbon banner and the angel playing her trumpet. I used a 6x6 paper pad by Dear Lizzie, Lucky Charm, for the cut outs and the background music sheet. Bought several 6x6 pads and some great Christmas paper at Tuesday Mornings. It inspired me to make Christmas cards. 
The base is an ivory cardstock stamped with a script stamp. I used Tim Holtz Vintage Photo to ink the edges. The "Joy" sticker is from my Christmas stash.  No packaging so I don't know the company, but I loved the glittering and gold accents.

That's my card for this week hope it inspires you to create a project for this weeks challenge at FCCB.

Don't forget we are having a Cricut Crawl and Vinyl University 9/9/2013. The Design Team will be showcasing projects made using vinyl from our sponsor, Cricket Vinyl Supplies.com.  Our sponsors will also be giving one lucky winner a Cricut Expression if we have 100 partcipants, so link up your project for a chance to win this awesome prize.

For an added bonus each Design Team member will be offering blog candy!!!!

See you next week, 
BYE, BYE, FOR NOW
KIM

Monday, August 19, 2013

SUMMER CAMP CHALLENGE # 174 AT FCCB

When I think of summer camp I think of all the fun activities, such as archery.  Of course there are other activities, canoeing, crafts, swimming, etc.  The inspiration for my card today was  the Adams Family movie when Wednesday and Pugsley are sent to summer camp.  Wednesday plays Pocahontas and dresses up like an Indian.  Here is my card inspired by that movie.


I used Paper Doll Dress Up for my little Indian girl. I cut the circles for my target from George and Basic Shapes.  The paper I used for the clouds are paper pad I bought at WalMart. The grass I cut out of two shades of green and layered them. I used some yellow hemp for her hair and headband. The chevron arrow sentiment is paper from the same pad as the clouds.  The face is a Peachy Keen Everyday face assortment.
I used pink ink on her cheeks and used my white gel pen to color the whites of her eyes and put freckles on her cheeks. A red glitter pen was used for the Bulls eye. She's a pretty good shot don't you think?

Hope your enjoyed my card and join us this week at FCCB for the challenge.

Don't forget our Vinly challenge coming up in September. There's a chance to win a Cricut. Awesome right? Check out the details at FCCB

 Bye, Bye for Now
KIM

Monday, August 12, 2013

COOL TREATS Challenge # 173 at FCCB

I don't know about were you live, but here in the south it sure has been HOT!  Maybe the challenge this week at FCCB will help cool you off.  This week the challenge is to make a card or project using cool summer treats.


This week we are being sponsored by Cri-Kits. I used an orange metallic gel pen to make a fudgesicle border at the end of my page. You can see the results above. The pen snapped into the holder easily. I started the flow of ink as instructed on a piece of scrap paper. Then I removed  my cutting blade and replaced it with the pen holder. I programmed my Cricut with the image I wanted and off it went.

Here is a link to their site

I bought my first Cricut to make scarpbooks.  I enjoy making layouts and I'm always scrapping pics of my boys when they were little.  I have tons of them (pictures).  I came across this picture of my youngest eating a fudgesicle and thought it would be perfect for this challenge, and something a little different instead of a card.
I kept it clean and simple because I wanted his pic to be the focal point.  The title "Yummy" of the layout is cut @ 2" using George and Basic Shapes using brown cardstock.  It was one of my first cartridges, came with the Cricut when I ordered it on TV.  Do you remember those late night commercials? Guess I'm showing my age. Any way, I still use this cartridge alot.
The background is a textured orange paper from Colorbox.  For the title and all the little descriptive words I used a coredinating cream color paper and used a brown maker to write them and then outlined each one with a line.  I also matted the two photos and used the brown maker to outline them.
For my fun fudgesicle's I cut them using Doodlecharms at 3".  The larger fudgesicle with the bite out of it is a chip board piece. 
The expression on my son's face is pricless.  I love all the ice cream dripping from his chin.  Adorable I know.  They certainly grow up fast it seems.  I'm just glad I have pictures like these to scrap to keep the memories alive.  

Hope you are inspired by my layout to create your own memories.  Join us for this weeks challenge at FCCB.

Bye, Bye for Now, 
KIM


Monday, August 5, 2013

FCCB CHALLENGE #172 MAKE A SPLASH

Hi! Everyone have a good weekend? This week our challenge is to create a water theme project.  Have you been to the beach, pool or water park to try and cool off? Share your card, layout or project with us.

We are also featuring digi stamps from the PAPER NEST DOLLS. HERE is a link to their site.

 They graciously allowed us to try out a sample of water related digis.  The one I chose to showcase was SAND CASTLE OWEN.


I have to say this was my first time to color an image for a card.  I know there are alot of crafters who use digi's on their cards and their coloring is so much better than mine. The only markers I had were Tim Holtz Distress Markers.  I watched a couple of tutorials on You Tube and gave it a try.  After 4 attempts this was the best I could do.  I really have respect for those ladies who make it look so easy. I am going to keep practicing though.  

For my card I used Colorbok 8x8 paper pad from WalMart as my back ground.  The sun and sunglasses were cut from Create-a-Critter at 1.50".  I put yellow Stickles on the sun and used black Glossy Accents for the sunglasses.  The sentiment is alpha stickers in brown glitter from Making Memories. The paper I used to cut the base of the card and the sun are Coredinations orange and yellow.

Check out the images at THE PAPER NEST DOLLS site.  If your experienced or giving coloring a try for the first time you will be able to find the perfect image.  They have a good selection of cute images.

Join us this week and have fun crafting.
Bye, Bye for Now,
 KIM

Saturday, August 3, 2013

MORE BABY CARDS

As I promised here are additional baby cards using the bydigitalpaper images. This time I did a boy and a girl card.


For the girl card I used the following supplies:
Cardstock from DCWV Lavender Chatuea
Pink and white polka dot paper
Frantage Shabby Pink embossing power
Elegant Edges cricut cartridge scallop frame
pink crinkle ribbon hand-dyed
Thickers pink and polka dot letters

For the boy card I used these supplies:
Blue cardstock from Coredinations
Paper Adventure blue-green striped paper
Frame from Elegant Edges
Banner Spellbinders die
Blue bling for sparkle
White gel pen for faux sticthing and sentiment

Hope you like them. I think they are adorable.

More projects to work on,
Bye, Bye for Now
KIM

Thursday, August 1, 2013

IT'S A GIRL

I'm on a baby card kick.  It all started on Tuesday when I needed a card for a baby shower and now I can't stop myself from using all those cute images from bydigitalpaper.  Here is my most recent card.  I will propbably be posting more as they are made.


I stamped the lavender card background with VersaMark and heat embossed it with Ranger Holigraphic embossing powder. The stamp I used  "It's a Girl" is from my stash, at the time I was throwing away the packaging so I don't know who it's by.  Now I keep my stamps in their original packing so I will know what company made them so I can give them credit in my post.
The adorable baby girl image is a frame cut from Elegant Edges Cricut cartridge  at 3.00".  I used cotton candy Stickles around the image.  I then punched a piece of pink polka dot paper with Martha Stewart's scalloped edge  punch. The lavender ribbon is also from my stash.

I am going to enter this card in the following challenges.

Die Cuttin Divas - Anything Goes
and

That's it for now, be back again to post some more baby cards. Thanks for looking.
Bye, Bye for Now, 
KIM